Showing posts with label eyeshadow tutorial. Show all posts

Tuesday, 27 February 2018

Mauve Eyeshadow Look

 Hi guys! I'm finally posting a new eyeshadow look! This was inspired by the nail look I did for Valentine's which used mauve tones.
I used the Laura Mercier Artist's Palette to achieve the mauve look, along with the Urban Decay Eyeshadow in Vape, Tattoo Liner in Trooper, They're Real Mascara, Decadent Lashes in Celine, and of course, Eyeshadow Primer Potion.
I used Real Techniques and E.L.F brushes. From left to right: deluxe crease brush, base shadow brush, contour brush, smudge brudge, accent brush.
I've already primed my lids, filled my brows (I used Benefit Cosmetics Ka-Brow), and dusted my lids with Vanilla Nuts using the deluxe crease brush.
 I then applied Fresco on the outer V and crease as a transition shade, using the deluxe crease brush.
Using the base shadow brush, I darkened the outer V with Truffle.
I used concealer to define the crease so that I have a blank slate to put my shimmery shade. I used e.l.f. smudge brush since that is the flattest eyeshadow brush I own.
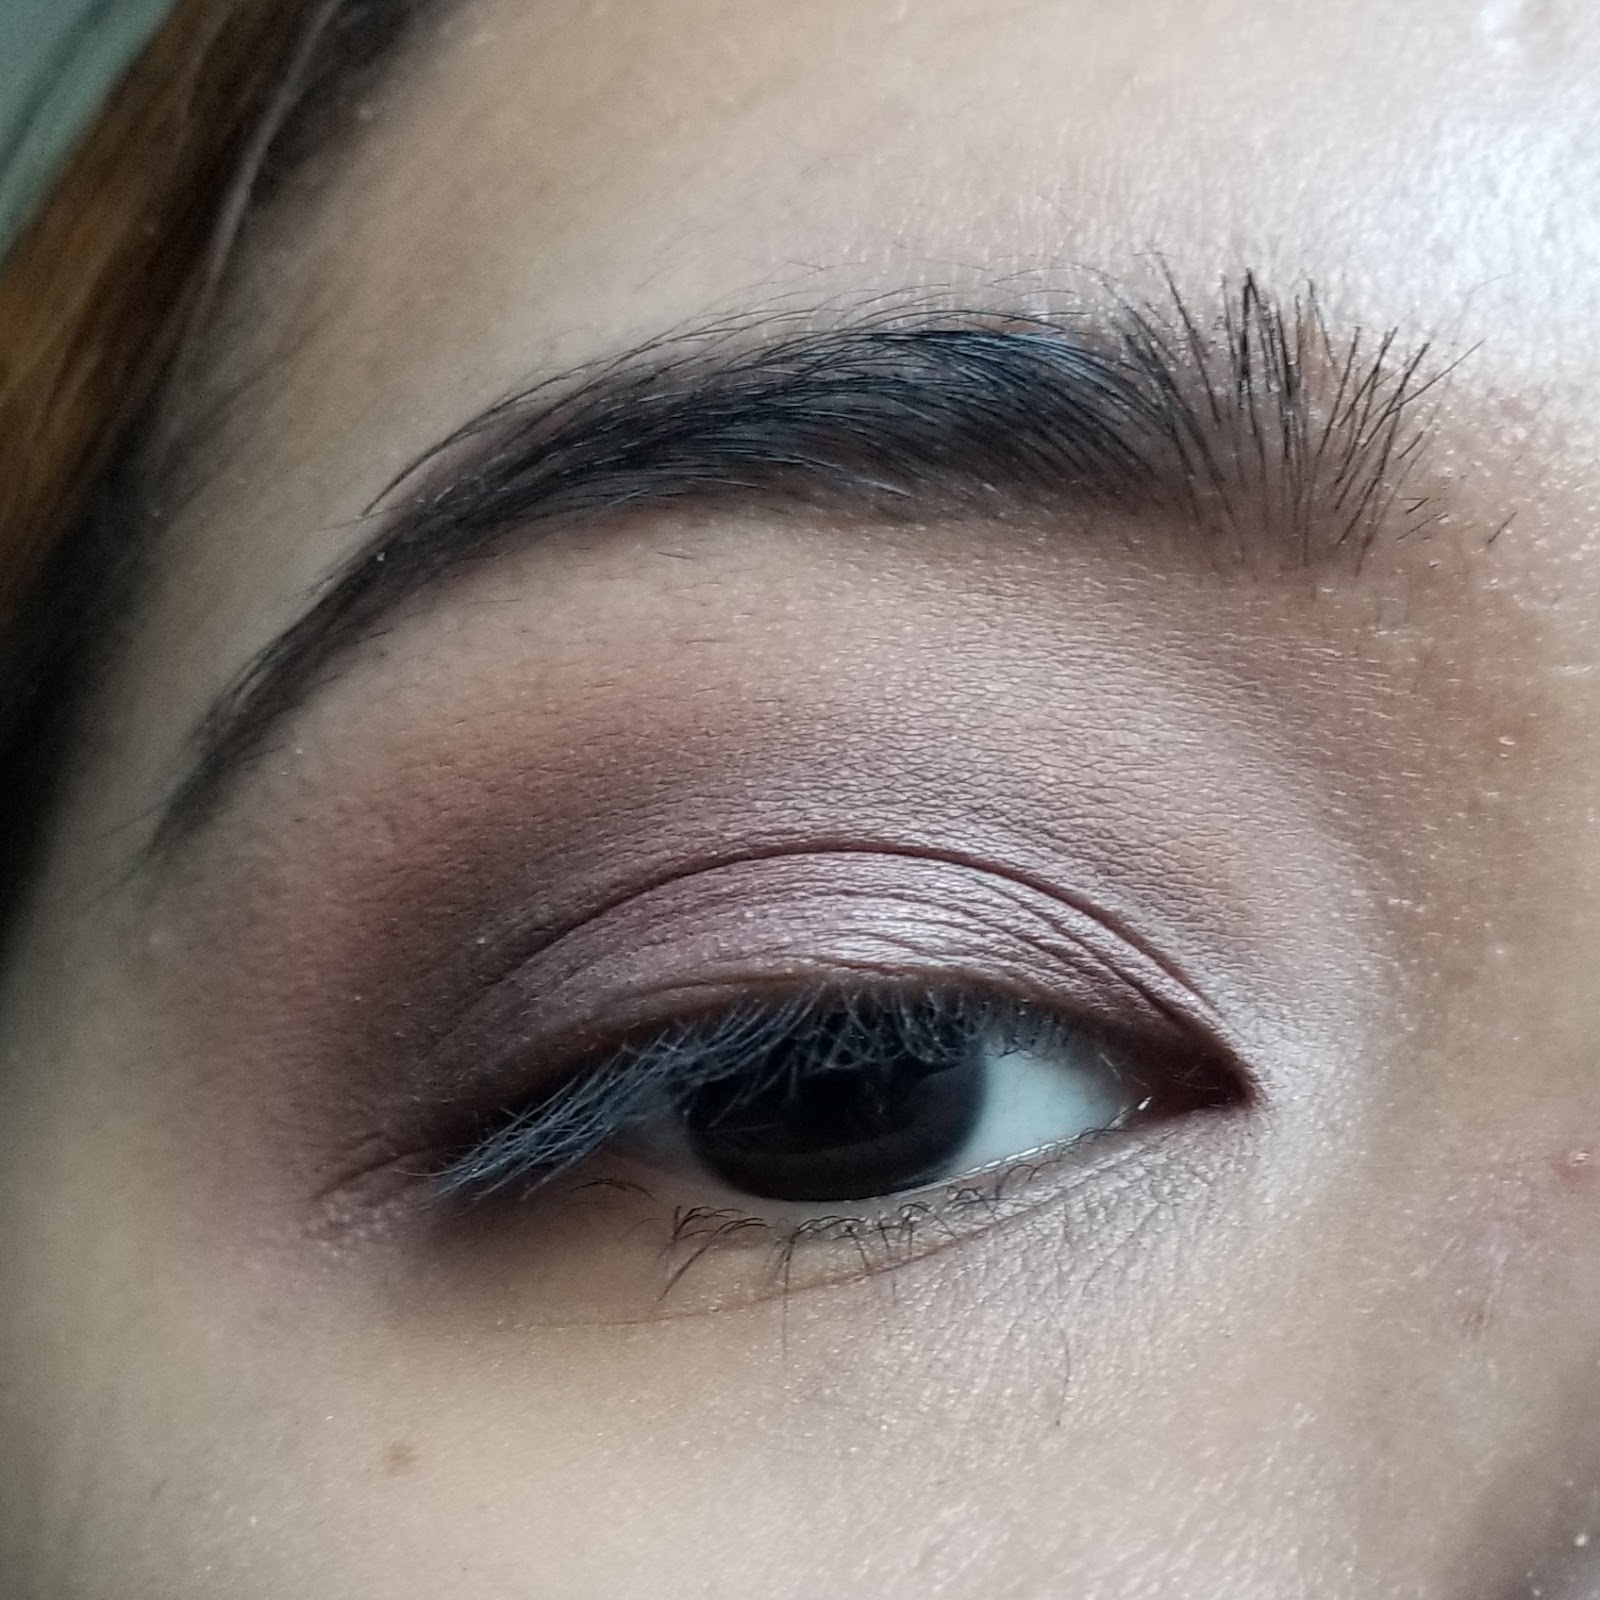
 Using the same smudge brush, I applied African Violet on the centre and inner part of the lids to add that shimmery mauve color, similar to Nails Inc Holler-Graphic in Ghetto Galactic which I used for my accent/ring nail.
 I didn't think the shimmer was enough so I added Urban Decay Eyeshadow in Vape to my lids, still using the same brush, and on my inner corner using Real Techniques accent brush.
 
I added a little purple tone to my crease using Violet Ink, because it was coming off too brown. Then lastly, I applied eyeliner, mascara and falsies.
So this is the final look! Thanks for taking the time to visit my blog!
I hope I get to post another eyeshadow look soon, instead of taking months. This is what happens when you're cursed with laziness. ðŸ˜… Let me know what kind of look you want me to see do next in the comments!

Friday, 22 September 2017

Subcuture Palette Review


Sooo... I guess here it is! Anastasia Beverly Hills' very controversial Subculture Palette! I got this about a month ago but this is the first time I'm opening the box and playing with the colours. I guess I was in a Schrodinger's cat situation and I was kind of scared of how it's going to be. (Not a smart idea because it would have turned out bad, I wouldn't be able to get a refund at Sephora). That being said, you can probably guess that I already have a good experience with this palette!
Firt off the colours are gorgeous. It's unique, edgy, perfect fall colours! The pigmentation is just amazing!
Top row swatches
Bottom row swatches
People are saying that it's too pigmented which makes it hard to blend. But for me if it's too pigmented, that means I'm paying more for the actual pigment than fillers!
But then there is also the argument of it not having enough binding agent so the shadows are too powdery and have a lot of kick-up, which wastes a lot of product.
Roxy and Axis are the shadows that have the most kick-up, but with a light hand, it will minimize the kick-up. With this, I can see why people were saying that Norvina should have advertised this as loose pigment shadow. But for me, the quality is still good and I just can't get enough of the colours!
Considering the powderiness, there's not much fall out. Axis had the most fall out when I played with the colours.
 I used Roxy as the transition, Adorn as a cut-crease liner, Axis on the lids, Rowdy and Cube on the lower lash line, and Cube on the inner corner. I used no primer and the shadows went on really well.
So there you go! Long story short, I'm really loving this palette!

Friday, 19 August 2016

Peanut Butter & Jelly Makeup Look


Peanut Butter & Jelly Makeup Look


       Even though I do not own the Peanut Butter & Jelly Palette by Too Faced, I'm still inspired to create a similar look using the Chocolate Bar Palette which I already have. For this look, I'll only be using three colours in the palette: Salted Caramel, Candied Violet and Marzipan.

I've already done my eyebrows and primed my eyelids.

Then, with a fluffy blending brush, I took Salted Caramel in the crease and inner corner. 

With a smaller blending brush, I took Candied Violet in the outer corner and slightly below the crease. 

I then took Candied Violet again along the upper and 2/3 of lower lash lines with a liner brush.

Lastly for the eyes, I put Marzipan in the center and inner corner of my eyes, as well as the inner third of the lower lash line. 

 Then take your favorite eye liner, mascara, and/or falsies.

Finally, I'm using Urban Decay Matte Revolution Lipstick in Bittersweet.
This colour is still available in their Vice Lipsticks collection.

The purpleness of Candied Violet is more apparent from a distance because of the pink micro shimmer in it.


Thursday, 26 May 2016

Orange Creamsicle Makeup Tutorial


Orange Creamsicle Makeup Tutorial


   It's been raining in Calgary for at least a week now, and today there's a thunderstorm. So what better way to celebrate that than to do this summer inspired look!

  I used the Too Faced Chocolate Bar Palette and Too Faced Melted Liquid Lipstick in Chocolate Milkshake, (Funny how I use both of their chocolate-infused products but I'm doing orange creamsicle. Meh they're both sweet.)

   Let's start with lips first because that's the simplest step: PUT IT ON YO LIPZ! Done! :D
You're probably wondering why I used this lipstick to get this look. I actually just came up with this accidentally. I was just going along with no direction, then ta-dah! Most of you are probably thinking that this lipstick is a lot more pink than orange. But when I apply it, it looks more like a peachy-browny-nude on me. Maybe it's how my Asian skin tone pulls the color out of the lipstick. If you're cool toned, Chocolate Honey will probably be a better choice for you. I could have used my NYX Soft Matte Lip Cream in San Juan, but I think that color is too neon for this look.
I swear I don't have a 5 o'clock shadow! That's just the shadow from my phone!
      Now for the eyes.
   On the crease, I used Salted Caramel using a Real Techniques Deluxe Crease brush. You can use any big fluffy brush for this. Using the same brush, I put Milk Chocolate on the outer V. Then using an ELF Eye Crease brush, or any smaller blending brush, I put Semi-Sweet on the smaller area of the outer V, concentrating it near the lash line. With my fingertips, I lightly tapped Creme Brulee on the centre and inner part of my lid. Then using a Real Techniques Accent brush, I put Champagne Truffle on the tear duct area. Lastly, I used Triple Fudge as an eyeliner with a Real Techniques Brow brush. Curl your lashes and use your favorite mascara, I used Benefit They're Real.

   Oh! Blush! I only own 2 blushes. I have a warm peachy Cover Girl Instant Cheekbones in Peach Perfection that I use during spring and summer, and a cool plumy Almay one, which I don't know what it's called because the top cover broke off, that I use during fall and winter.


   Here's the final look! Thank you very much for reading my very first makeup tutorial. Hopefully I'll do a video one day, but my train of thought flows much better when I'm writing than speaking, which makes me a very awkward person. But as they say, practice makes perfect so we'll see!